Background

Saturday, July 28, 2012

Simple Smash*ing: Issue No. 5

I haven't been able to Smash* so I thought I would provide some free journaling cards via different websites that I've come across.

As we all know the scrapbooking world has been taken by storm by Project Life, Smash* journals and DIY mini albums. I am in love with all of these things. I haven't tried Project Life but I love seeing everyone's journals on Pinterest and in different blogs. They are so cute!

Wanna know what else I love? Printables. Journaling cards. Ahhh! I can't get enough of them. I thought I would share some of the websites where I found some printables for free. Enjoy!

Creativity Prompt - Outnumbered (There are a TON of free printables on this site. You have to just keep on clicking. It took me forever to get through it.)
One Velvet Morning (This is another website with a TON of printables.)

I hope you enjoy my little list of goodies. I do not take credit for any of these printables that you are about to enjoy. 

If you would like me to add something to the list please let me know!

I hope you have fun scrappin' away this weekend. 

...until next time...

-Sam


Wednesday, July 25, 2012

Instagram Wednesday: Tomato Love

This "love"ly shaped tomato came out of our little garden. I instantly thought that it looked like a heart and I had to Instagram it. 

What oddly shaped veggies has your garden grown? I would love to see them!

...until next time...
-Sam

Tuesday, July 24, 2012

Pebble Magnets

Happy Hump Day Eve! Welcome to Tuesday everyone! As of right now, I'm on my lunchbreak, eating McDonald's. You gotta love a $1.00 large fries. 

I wanted to share with you some new magnets that I created over the weekend. 


I know I'm not the first person to ever make them and I know that you've probably seen them on multiple blogs and Pinterest. They are the easiest little things to make and they are a hit! I actually sold both of these sets within minutes of posting them to my Facebook page. 

I have another set in progress that I started last night and they should be posted on my page either tonight or tomorrow. 

I hope you enjoy and stop by my Facebook page sometime and say hello! I would love to hear from you!

...until next time...
-Sam

Saturday, July 21, 2012

Tutorial: Glitter Coasters


First of all, I want everyone to know that I hate working with glitter. That’s an extreme emphasis on hate. Yes, I know hate is a strong word but I really think that all this glitter business should be left to Tinkerbell.

I’m going to show you how to make glittery coasters that are a great accessory for any room or patio. I haven't found a tutorial that I liked on how to make these so I thought I would just do my own. Here. Goes. Nothing.

Materials:

1. Glitter (I used fine glitter. You can try different types but I'm not sure how well it would work.)
2. ModPodge
3. Bathroom Tile
4. Foam Brush
5. Paint Brush
6. Cork or felt for the backing
7. Newspaper or something to catch all the glitter
8. Polyacrylic Sealant (I use Minwax brand.)

How to:
1. Apply the ModPodge on the tile with the foam brush. It doesn't take a whole lot so no need to over do it.

2. Pour the glitter. I mean really pour it on thick and make sure you have your newspaper laid down to catch all of this craftiness that's going on. There should be no white showing from the tile.


3. Pick up the tile, remove the excess glitter by tapping each corner and side gently to make sure any glitter that isn't stuck to the tile is removed.

4. You must then wait for the first coat to dry. I would leave it alone for the next couple of hours or possibly even overnight.

5. Repeat steps 1-4. FYI: applying the second coat of ModPodge will not go smoothly with glitter already applied to the tile. The foam brush will pick up some glitter but no need to worry unless a big chunk of the glitter comes off but you can just fix it with the second coat.

6. After the second coat of ModPodge and glitter has completely dried, you will then use your paintbrush to apply the sealant. You can apply as many coats of sealant as you would like. I did about two but you must wait for the previous coats to dry.


7. After you have completed the sealant step you can then apply the backing to your tile. This will allow for safe placement on your furniture.

8. Enjoy your new set of coasters!

I hope you enjoyed this tutorial and I hope it inspires you as well. I would love to see the coasters that you created!

...until next time...

-Sam


Tuesday, July 10, 2012

Let's Color

It seems that a lot of people these days like to use color palettes for pretty much everything. I stumbled across a color palette generator on Pinterest and I thought I would see how well it worked. 

I started with this photo. It has bright colors and thought it would make a really nice color palette that someone could use for their card making or interior design. Plus, who doesn't like hot air balloons?


This is what the color palette generator came up with for the photo. I did a screenshot and then cropped out the palette

I think it did a pretty good job. The generator provides a dull color palette as well as a warm color palette. Personally, I like the vibrant colors better and I think this would make for great card colors!

I've come to find out that this can be really addicting to do. So, I made another out of this picture.

Result:
This is definitely my favorite out the two photos. The palatte is so soft, girly and modern. These colors are really "in" right now. 

Would you like to make your own color palatte? You can find the tutorial here. I hope you have a blast making your own! 

I would love to see if you do any crafting or decorating with your color palette. 

...until next time...

-Sam

Saturday, July 7, 2012

Simply Smash*ing Friday: Issue No. 4

Yes, I know it's Sunday, therefore the title of this post is a complete and utter lie. You can't trust me. I'm evil. Just kidding. I'm really not. I worry about everything and I'm really honest about things. I'm a horrible liar and I'm reeling from the guilt about lying to you about what day of the week it is. =)

Anyway, I haven't smash*ed in a while and I finally sat down Friday and Saturday, put my nose to the grindstone and smash*ed away! It felt really good to finally actually do a few pages that don't involve magazine clippings or just writing.


This page is about Apple Blossom. If you don't know what Apple Blossom is, you should inform yourself, here. If you click on that link, you will see the Grand Marshall from this year's festivities. MARIO "A.C. SLATER" LOPEZ! I thought I was a 13 year old girl when he rode by on the parade. He's a pretty big celebrity to come to the little town of Winchester, VA. Who doesn't love "Saved by the Bell," with Zack, Kelly, Jessie and the rest of the gang? I watched it yesterday morning, actually. It's so nostalgic for me.


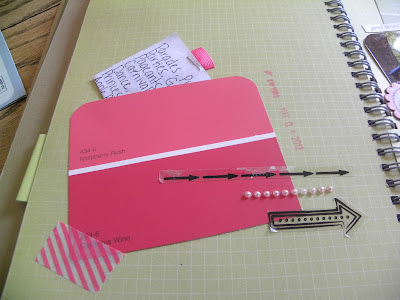
This is the other page that explains what Apple Blossom is. The arrows that I put on this page are so old. They were so hard to get off the sticky page and the top arrows didn't fair well. I've also had this paint sample thing sitting around for a while. I made it into a pocket!


This was today's project. I thought it would be neat to see how this chalkboard paint that everyone is talking about, works. It's AWESOME! I'm going to be chalkboard painting everything now. It makes a neat page for your journal.

BEWARE: chalk is not the most permanent of writing utensils. Duh. It smears, so be careful of where you are doodling or you will erase your doodle. I just had an awesome idea about chalk. They should make it in a pen form where it's not so bulky. They make fine point paint pens....why not chalk? Doodling would be so much easier!

I guess if you wanted to preserve your doodle, you could spray it with hairspray. I know that works on charcoal drawings, so it may very well work for chalk as well.

The little bird and flowers are Heidi Swapp rub ons. I have no idea what brand the little black and white frame is. 

I just came across these free journaling cards on Pinterest that you can download and print out. They are so cute and would look great on a Smash* page! You can download them here!

Enjoy your Sunday, everyone! It's back to the grind tomorrow. 

...until next time...

-Sam


Related Posts Plugin for WordPress, Blogger...